General Usage
First Steps
After the installation, simply open Cantara with your start menu or the cantara command. You will then see the welcome assistent which helps you to go through the configuration of Cantara.
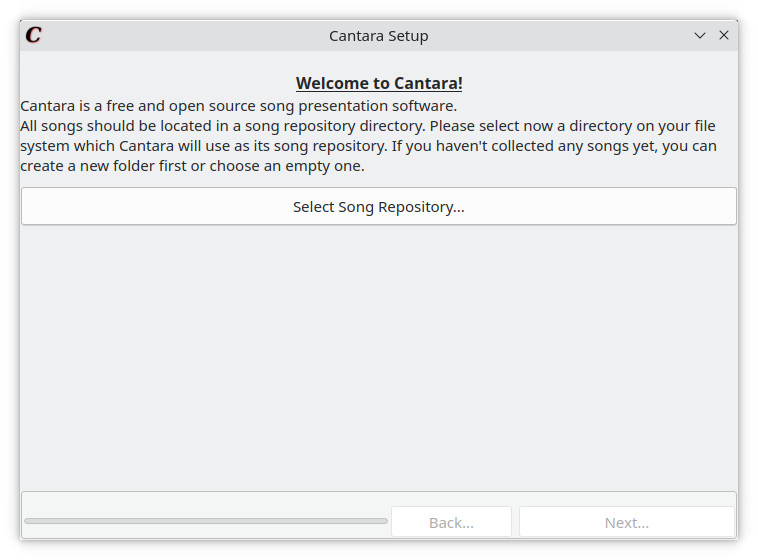
Here you should choose a song repository directory where you all the song lyrics files are stored. If you have none yet, you can create an empty new folder and select it as your song repository. The assistent will suggest you to add “Amazing Grace” as an example song which you can use to understand how the program works.
After you have finished the welcome assistent, you should also adjust the font settings, the text color or the background color according to your wishes. You can do that in the Settings (Edit -> Settings). The option Spoiler next Slide will show the lyrics of the next song part in smaller font size under the current part.
Beside that, you can configure how the Meta Data of songs should be displayed. See more details in the section Meta Data.
The Song Selection Window
If the configuration has been done successfully, you will come to the song selection window where you can choose the songs which you would like to sing. The search field may help you to find the one you like. Simply double-click or press enter after the selection of the song in the left list, and the song will go to the right list where you can adjust the order or remove the selected songs.
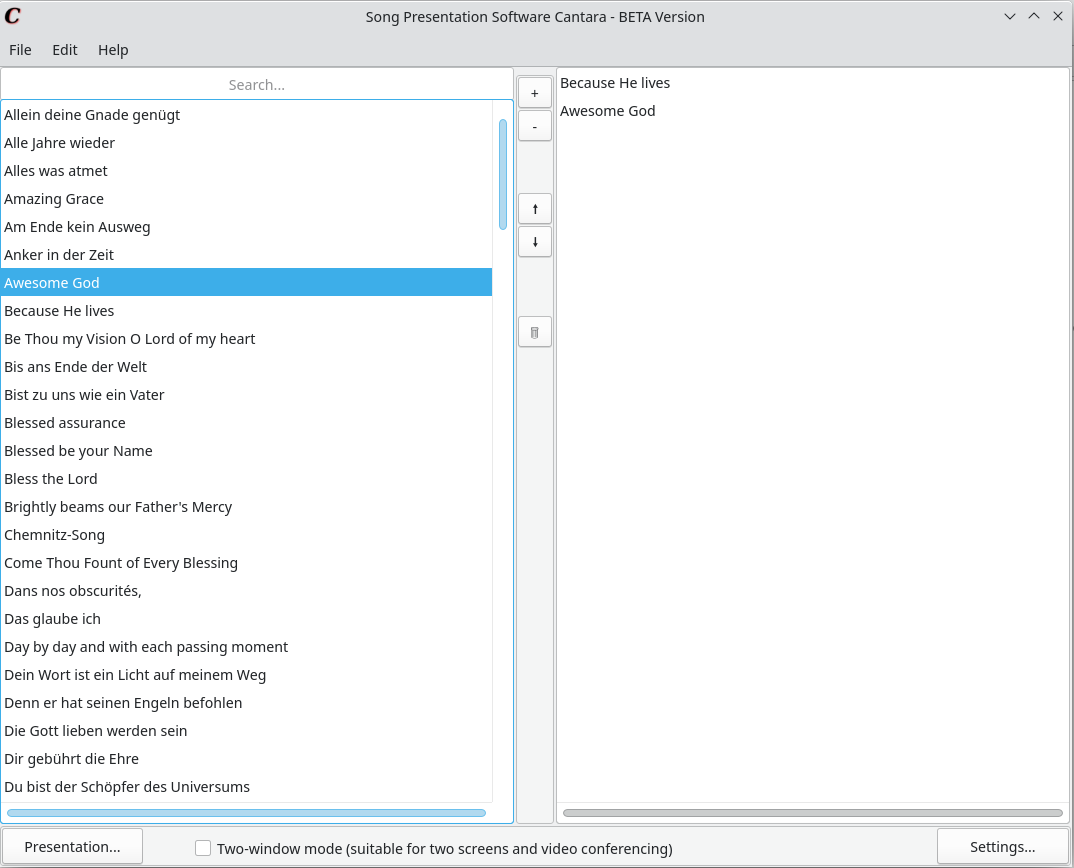
After you are done, press the Presentation button to start the presentation. You can also press CTRL+P instead.
Tip
Cantara will automatically detect at start whether you have connected a second monitor (like a second screen or a beamer) to your PC. If so, it will select the two-windows-mode automatically. You can also adjust this as you want.
During the Presentation Mode
During the presentation mode, you can control the presentation slides via several ways:
- Using the arrow keys: You can use the arrow keys of your keyboard to go forward or backwardF
- Pressing F5/F11: this will toggle fullscreen
- Using the Enter or Space key: You can use Enter or Space for moving a slide forward
- Pressing ESC: will end the presentation
- Mouse Click: Will move a slide forward
- Clicking at a song at the right selection list in the song selection window (multi screen-mode only): You can directly jump to a certain song
Tip
If you are running other programs like Libreoffice Impress or MS PowerPoint in presentation mode at the same time, you can easily switch between the presenters with Alt+Tab. When the presentation mode in Cantara gets started, it will cover the second screen and be in foreground. To move Cantara to the background, press Alt+Tab to navigate to the program you want to show up.
Adjust the Presentation
After you have seen the default presentation style, you might want to adjust it according to your wishes and needs. For this, you can open the settings dialog (Edit -> Settings). There you can set up the following:
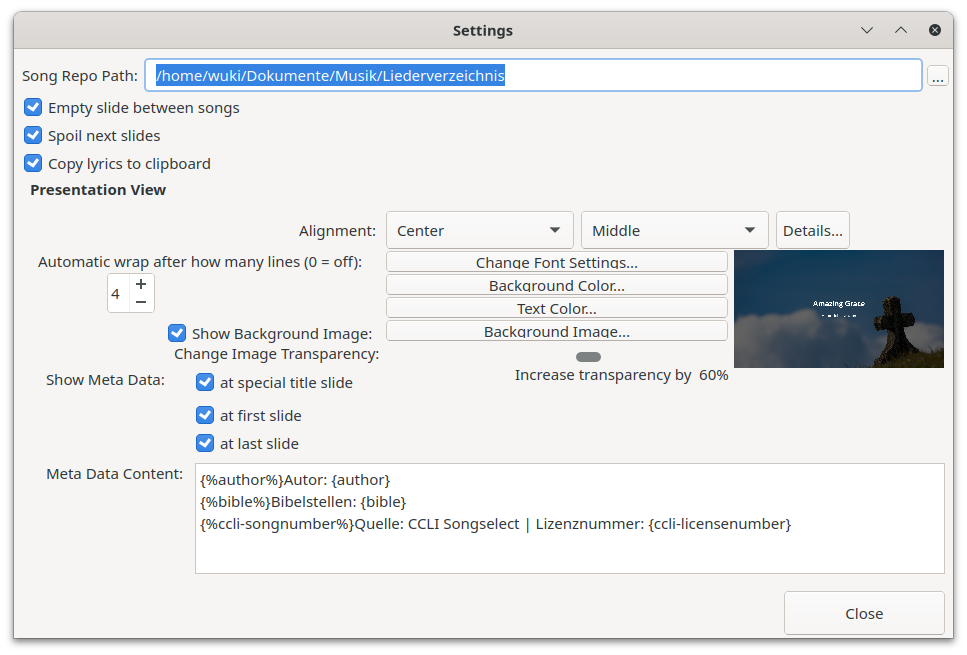
- Song Repo Path: The path of the song repository. Use the button with the three points (..) in order to select a file chooser dialog.
- Empty Slides between songs: This creates an additional empty slide in the presentation between two different songs.
- Spoil next slides: Displays the content or parts of of the next slide below the text if the song has an additional slide and the space of the slide is sufficient.
- Alignment: Adjust the horizontal and vertical alignment of the text in the presentation slides. Press Details to set up the border size.
- Automatic word wrap: Brakes the slides into if one stanza (song part) has reached the specified limit of lines (recommended especially if you have songs with long stanzas).
- Change Font Settings…/Background Color…/Text Color…: Opens dialogs for specifing the design of the presentation.
- Background Image: Opens a file chooser dialog where you can select a background image for your presentations. If available, the folder with some default background pictures will be opened at first.
- Change Image Transparancy: Adjusts the image transparency towards the background color. That means if the background color is (for example) set to black, a higher value will make the picture darker. If the background would be white, a higher value will make the picture brighter.
- Show Meta Data: Certain Meta data can be shown at a special title slide (if choosen), at the first slide or at the last slide. Enter the syntax in the big edit field at the bottom and see Meta Data for detalis.
- Preview image: Click at the preview to go one slide forward. If the presentation has reached its end, it will go back to the beginning.
Export Presentation
Cantara offers several ways for exporting presentations so that they can be reused in an other program or for an other purpose. All the export options are available in the export menu of the main window. Generally, there are two types of exports:
- Export the presentation slides: This will export the presentation slides exactly as they are displayed inside Cantara. At the moment there are two export options for this type:
- Power Point Presentation (.pptx-file): This will export the slide presentation as a pptx file so that it can be used in a presentation program (Microsoft Powerpoint, Libreoffice Impress, Softmaker Presentation etc.). For the generation of the slides, the JavaScript library PptxGenJs (MIT license) will be used inside the local web browser as a renderer.
- Pictures/Images: This will export a JPEG file for every slide and save it into a folder of choice.
- Export the Lyrics as Markup: It will export the lyrics of the songs in their right order in a specified markup format but without any presentation settings (slide breaks, background picture, colors, etc.). This can be used (but is not limited) for:
- Exporting the songs as a WhatsApp/Telegram message so that it can be shared a long groups/channels for the congregation/people to sing along
- Exporting the songs as a HTML webpage so they can be published on a webpage
- Exporting just the titles of the song so they can be reported to CCLI.
The structure of the markup can be specified through a LaTeX style markup language. Go to Export -> Markup Text To open the Markup Export window.
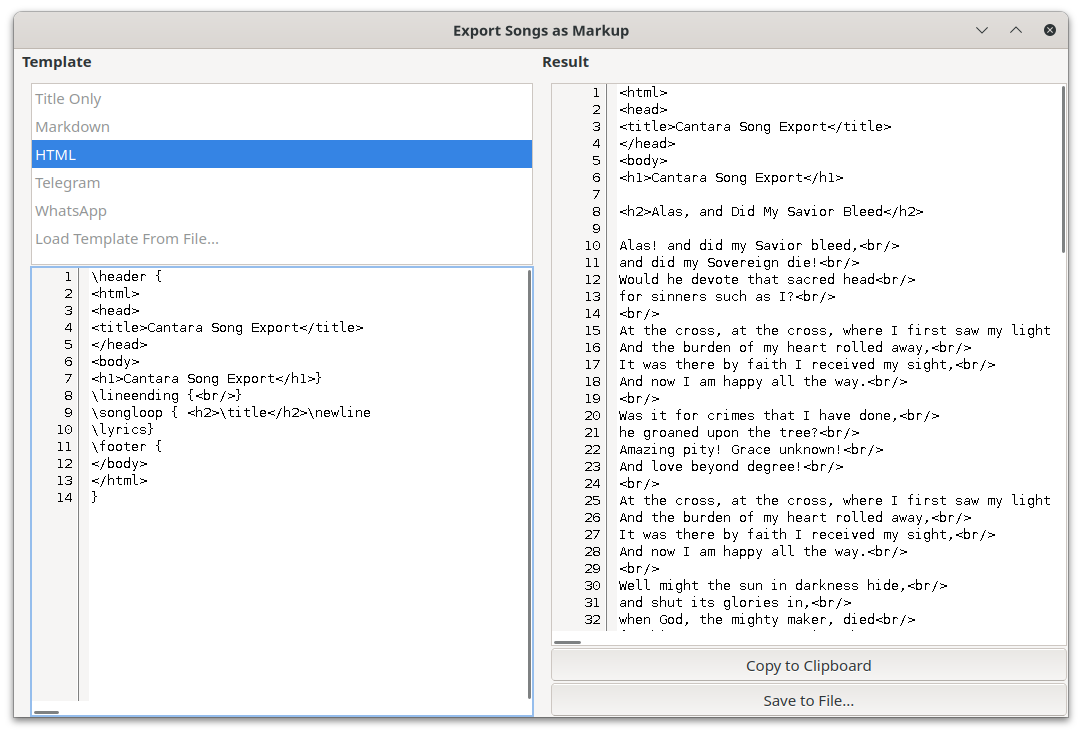
The template language supports the following commands/environments. All of them are optional:
\header { ... }: The header part of the document which will be shown at the top of the document. No song specific content can be displayed here as this part is outside of the song loop.\footer { ... }: The footer part of the document which will be shown at the bottom of the document. No song specific content can be displayed here as this part is outside of the song loop.\newline: Inserts a system default line break\betweensongs { ... }: Defines what should be displayed between two songs (but not before the first song and after the last song). The default value is set to two line breaks (a new paragraph:\betweensongs { \newline \newline })\lineending: Specifies the line ending inside the song loop (default value is\newline)\songloop { ... }The content which will be displayed for each song (repeated for each song). Inside this environment, song tags (see Meta Data) can be accessed via\tagname– for example\titlefor thetitletag and\authorfor theauthortag. The lyrics itself a loaded via the\lyricscommand.
Save and Load Song Selections
You can save and load song selections into Cantara to share it within the organization or for preparing an event. While doing so, you have two options:
- The songtex-format contains the song names and the song file with its content. That means, if you export the songselection to a songtex-file, the receiver don’t need to have the songs in his song repository. While importing the songtex-file, Cantara checks whether the file already exists in the repository, and, if not, adds it.
- The legacy export/import function imports only the titles, that means, the receiver needs to have the songs in his song repository.